When you click on links to various merchants on this site and make a purchase, this can result in this site earning a commission. Affiliate programs and affiliations include, but are not limited to, the eBay Partner Network.
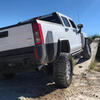
Hummer H3For the Hummer driver who wants the rugged look and off road capabilities of the Hummer, but in a smaller size and with a more fuel economy friendly engine.
Wanted to update you guys on past work. Had the truck all final tuned back in April and WOT tuned as well.
Unfortunately, no real HP numbers to share because they didn't want to put the truck in 3rd gear (1:1 ratio) due to driveshaft speed with the increased driveline angle of the driveshaft from the lift. So, the truck was tuned in second gear for the WOT purposes (lower figures if measured). I plan on visiting my other buddy's shop where we'll see real figures.
But she was all set and perfected drivability, shift points, converter lock-up etc. Here's a snippet of one of the WOT runs.
Looks fantastic and i know you put that work in. I built a S10 /ls1 swap back in 2010-11 and man it took me over a year. Built the motor myself and have it still on the S10forums.
I have an 09 alpha now I'm doing research on now to see what's involved with the swap. The 5.3 it has is crying oil from the block and rear main. Not bad but not worth fixing.
I've read a few posts but like you mentioned most swaps have cooling issues.
You didn't mention anything about wiring since the ls3 uses VVT-i and the lh8 wiring doesn't. What did you do for wiring?
Just another toy, only thing I changed was the engine itself. The LS3 in general actually does not have VVT or AFM (DoD). Even if it did, when I had this engine custom built, I could have easily built it without them. The LS engine has the same physical dimensions as ours, they are in the same architectural family, so everything bolted up and operated as usual -- minus the tuning required.
Hey fellas... am a bit behind on here but still active with the H3T. Will get caught up with you guys to keep you updated...
This past summer, I decided to change the fluids on the differentials, since they were the only fluids I had yet to change on the truck.
Drained the fluid, cleaned out the interior of the diff with brake clean, and inspected the gears as seen below. Then performed same items with the front diff...
Adding a bit of protection to the rear with this powder-coated white spider diff guard by Purple Cranium.
After cleaning out and inspecting the diff/gears, wire-wheeled the stock diff cover, and painted with chassis black paint. Replaced old diff cover gasket with new GM gasket.
I bought this fancy dual battery tray from German @ Lased Designs as soon as he released it (hmmm maybe 2 years ago?), but I never got around to installing it until a few months ago.
Here's a raw pic of one from his website.
And here's how mine turned out after I sent it out to be powder coated. Notice the 4 holes on the bottom of the dual battery tray. To mount the tray in, we mock-fit the tray in place to wear we wanted it, center-hole punched each hole, drilled out 3 of the 4 holes and installed nutserts.
First step was to remove the single Optima and take out the battery tie-down bracket...
The stock battery tie-down mount is secured by 4 pinch/spot welds. So we took a spot weld remover tool to work to get it out of the way. Was a bit dirty under the battery with dust/sand getting caught under there!
And here's the final look during mock-fitting for the bolt points/nutserts.
Wired the truck in parallel and all set! Happy to start removing things from the garage that need to be installed lmao.

 07-14-2022, 10:17 PM