When you click on links to various merchants on this site and make a purchase, this can result in this site earning a commission. Affiliate programs and affiliations include, but are not limited to, the eBay Partner Network.
Hummer H2For those who like a little more gleam to their Hummer, the H2 offers a similar rugged look as the H1, but as a lower cost, and with more added features, making it almost a massive luxury SUV.
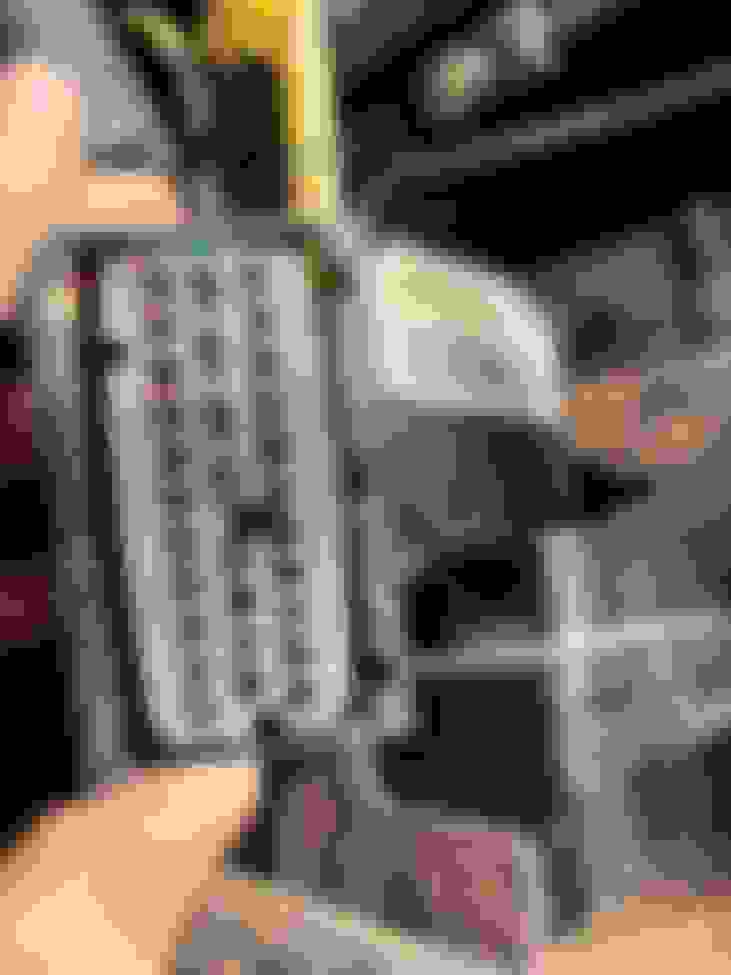
check your pins to the errors like pin 1 and 4 for a start.
they look like they might have corrosion. ( dark grey almost pewter) as opposed to shinny metalic.
you can also test for continuity from the harness to the wheel sensors.
I checked now the coninuity of every sensor, everything fine.
Then I thought about opening the module where the other one repaired it and having a look at it
This was the picture what he showed me... it looks different isn't it?
12 & 15 grounds are essential, electronics with poor grounds won't function correctly.
Looking at your module pics, it's not clear what's going on, you've correctly circled gold wires that have clearly melted and become disconnected. The solder bridge doesn't look right, did the other wires melt post repair?
You have before and after pictures to see what work was done, if this is a service error a refund may be in order, the resolution of your earlier pic makes it hard to compare, similar sized higher res pics would help.
It would be good to know what connector pins each of the gold pads link, this may shed some light as to how and why the gold wires became melted.
H2 modules tend use a clear gel for environmental protection (fortunately) ideally this should be re-sealed in the places where it was removed, not sure what with, but one would think its possible.
Just looking at the pictures, I'd be tempted to de-solder the blob and somehow carefully re-link the broken the two pairs of wires (if even possible) Note the wires have been doubled-up to handle the current so a single strand of thicker wire should work ok.
As an engineer I'd need to know what circuits/sensors they control (right wheel sensor?) and I'd 100% check there are no shorts in the harness or sensors as a replacement ECBM might suffer the same fate.
This module may become damaged electronically, the burnt-out wires suggest some kind of severe overload, perhaps whilst working with the battery connected, or because of the solder blob.
You seem to have a lot of patience
either there was an overvoltage somewhere or the repair service did a poor job.
I can't tell if the other wires melted after the repair, but this should almost be the case if he repaired it. In any case, I have 4 melted wires and he showed me 2.
Unfortunately I can't find a wiring diagram to tell me which melted wires are for what.
Soldering the melted wires is not possible for me with the normal devices, much too small.
How can I check whether there is a short circuit in the wiring harness?
I have always removed and reconnected the ABS module with the battery disconnected.
@George W
Investigating your images further and putting things in an electrical context:-
There are actually only 2 broken circuits, even though there are 4 wires, these as mentioned before, are arranged in pairs double the current handling, each pair links a module pad to a connector thus there are only two. So in effect there are two links to be made and one solder bridge to remove.
You can se the left-most pair burnt-out after the repair, your earlier blue-tinted image clearly shows them intact.
The repair service seems to have made an error by bridging the single connector pad to the pad with the two thick wires, however without knowing their function it hard to 100% prove this would cause a problem, but I'd say it's very likely.
The two thick wire are most likely either ground or power, this you could prove using a multimeter and find out what socket pins it connects to
To check the wiring harness there's a maximum of 30 pins of which only 22 are used. Disconnect the battery, put a multimeter on low ohms then starting at pin 1 (RR Sensor) see if it connects connects to any of the remaining pins (21 places) it will but should read anything like a short circuit (make a note for the resistance reading) Pin 1 can no be ignored then move on to pin 2 and check the remaining 20 pins, Pin3 and the remaining 19 pins.
This will tell you if things like speed sensors are open circuit, short circuit or connect somewhere they shouldn't. As you go down the pins look at the diagram to see what the circuit is for example pin 13 should connect to pin 14 (+12V) similarly the grounds will link to each other.
Taking the view there's nothing to loose this would be my approach:-
Using a small fine pin or sharp needle to penetrate the gel, go down the row of pads an find where they link up to, the gel should self-heal as it's only a small pin-*****.
Using a fine blade, carefully cut-away around the 4 pads (as little as possible)
Using single strand tinned wire solder and link the two connection points.(if it will solder, this is unknown as the previous wires are welded but looks like it will given the repairers did it)
Use some electrical sealing gel to go over the soldered wires and re-seal them.
Will it work?
25% chance perhaps, the question is why did the original twin circuit burn-out, so I'd need to know what circuit that is (easy as mentioned in top item 4)
I checked the two thick wires.
both are connected as ground with Pin15, so both of them beep with the multimeter.
I will check tomorrow the wiring harnes, its 1:30 a.m. in Switzerland
according to the row of pads and link up to, do you mean I should check with the multimeter the pins with the connector, like that?

 06-14-2024, 09:55 AM